Power consumption is a big issue for us. We would like to be able to leave the balloon up taking pictures for as long as we can. And we would like to know how long that would be.
One of the main suspects of “battery eating” on the balloon is the camera. It is not the only one, but that is the subject of other articles.
So, I (guijemont) had at hand the camera we want to use (a Canon PowerShot SX110 IS), AA batteries, some wire, alligator clips, adhesive tape and a multimeter. And I wanted to get an idea of how much power the camera draws.
A bit of theory
My idea to measure the power consumption was to use one of the expressions of Joule’s Law that says:
P = V I
Or in other words, the power the camera draws (P) is equal to the voltage (V) of its power source multiplied by the current intensity going through it (I).
V is easy to know: 2 AA batteries in series is 3 Volts, right? For more precision, I measured it with the multimeter anyway.
Then we want to know the intensity. That’s where MacGyver comes in.
Enters Angus MacGyver
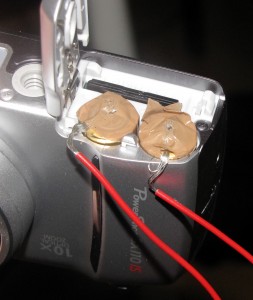
To know the current intensity, I needed to have the multimeter in series with the camera and the power source. My mullet-hair-styled solution was to tape the wires to two ends of the batteries, as shown on the picture.
This allows me to plug the multimeter easily to the other ends of the wires, while the battery compartment is closed (else the camera won’t start). At the same time, the tape acts as insulation to make sure the multimeter is not short circuited. The tape I had was really thin though, and as you can see on the picture, the wires kind of got through, so I had to apply several layers of tape on the batteries.
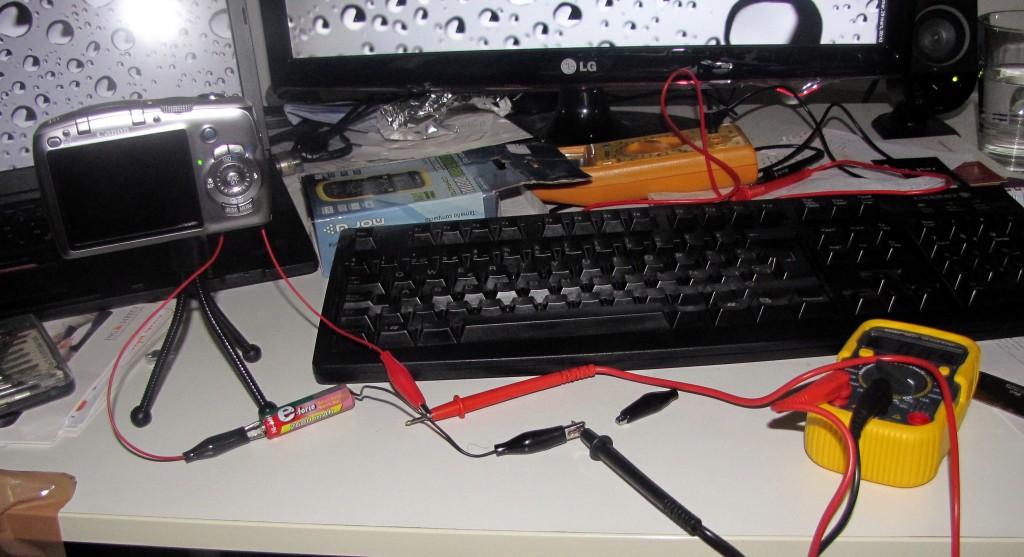
With that in place, all I had to do was to plug the multimeter to these wires, in ammeter mode, start the camera, and measure!
If it fails, try harder!
Unfortunately, MacGyver science is not exactly deterministic. Apparently, something in the circuit (yes, I am looking at you, cheap multimeter!) had a non negligible added resistance, meaning that when the camera was asking for a lot of power, the voltage provided by the batteries was dropping. The firmware interprets a low voltage to be caused by the batteries getting empty, warns the user about it, and shuts everything off. At least, that is my theory on what was happening, hopefully I have readers who understand this better and can tell me if I’m on the right track or misinterpreted things completely.
But for every electrical problem, there is an (unsafe) MacGyver solution! In this case, I just added another battery in the circuit, with the help of more tape, wire and alligator clips.
I wasn’t too sure the camera wouldn’t explode due to the added voltage (I had around 4.2V instead of the recommended 3V), but sometimes, you just have to take risks!
It turns out this circuit worked quite well.
The results
I measured the voltage of the 3 batteries in series before and after the tests (they took quite a hit). This was around 4.20V before and 4.02V after (not sure that much precision is needed, I guess we can retain 4.1V).
The following scenarios were measured, in Amperes. I added the power values I calculated in Watts (knowing the power source was about 3.1V):
- standby, screen off: 0.09 A (0.37 W)
- screen on, objective closed: 0.3 A (1.23 W)
- screen on, objective out: 0.35 A (1.44 W)
- maximum seen when taking a picture or preparing with autofocus (AF): 0.49 A (2.01 W) (happened at first pre-press, with autofocus)
- maximum seen in the process of taking a picture with AF off: 0.37 A (1.52 W)
Other parameters I tried to change, such as the Image Stabiliser (IS) did not seem to change consumption. Note that these measurements were done in fully manual mode. Having automatic adjusting of exposure might suck slightly more power.
Analysis
Assuming the only difference between (1) and (2) is the screen, we can say the screen eats around 0.86 W. Therefore, we hopefully can expect the following power draws:
- standby: (1) = 0.37 W
- picture taking time (5) – (screen power draw) = (5) – ( (2)-(1)) = 1.52 W – 0.86 W = 0.66 W
As an example of consumption, if we take a picture every minute, and it takes us 1s to take a picture, the average consumption would be around:
(59 * 0.37 W + 1 * 0.66 W)/60 = 0.37 W
In the same way, with a picture every 10s, we would have an average of 0.4W. If we can’t get the screen off, we need to add its consumption (0.86W, ouch!).
Note that the measurements might not be that precise, and the voltage was higher than normal, so we shouldn’t really assume anything more than:
- standby eats around 0.4 W
- taking a picture eats around 0.7 W for an unknown amount of time (I guess ~ 1s)
- the screen eats around 0.9 W
Therefore, for our usage the most optimistic average (taking a picture takes a very short time, screen always off) would be 0.4 W, the most pessimistic one would be the worst we measured with AF off and screen ON: 1.5 W (we won’t need AF because with the balloon high enough, we can use a manual infinite focus).


Or, you know, put fresh batteries, load up CHDK (you did look into CHDK, right?), fire an intervalometer script and let it take pics till death ensues. That seems simpler and more accurate.
Did you check if the festival location is usually windy ? If it is, a kite would be better suited than a balloon.
Good luck!
Regarding CHDK: we think of using it, but I haven’t found a way to make the camera go in “low power” mode, so we might fall back to triggering through the arduino that we’ll have onboard for monitoring anyway (should be doable with the usb host shield over ptp), that way, I think we can rely on the automatic “go in low power mode after 10s of inactivity” mode, which for some reason is disabled with CHDK (even without running a script).
Regarding wind and kite: from what we’ve been told, we can expect a wide range of conditions over the wind, going from “no wind at all for several days” to “sand storm”. To be versatile, we are thinking of making a balloon-kite hybrid. One thing to consider is that we would like to be able to have the camera up for a long time while being able to forget about it and enjoy the event. I’m afraid a kite-only solution would require permanent monitoring.
On some cameras plugging a jack into the video output is enough to turn off the screen, saving precious power. If you use arduino you might find useful stuff <a href="http://photocerfvolant.free.fr/phpBB2/viewtopic.php?f=6&t=423&st=0&sk=t&sd=a" here or there, in french.
On average wind is 3-4 Beaufort according to http://www.windfinder.com/windstats/windstatistic_zaragoza_aeropuerto.htm . Your mileage may vary. You can design the rig and attach it to either a balloon or a kite depending on the weather.
A kite requires monitoring, especially when there’s ~1kg dangling from its line and people around.
Thanks for the links, will have a look at these projects.
Regarding the jack, I tried that on my camera (not a jack, but a proprietary mini-usb-like camera). Indeed the screen goes black, but the power consumption remains the same as when the screen is on…
For the wind, I had seen that, but the site is quite far from the Zaragoza airport (some 70 km iirc) and in-between hills, so I believe our mileage will vary quite a bit…